

The Complete Guide to Build Your Personal AI Operating System With Claude Code
Starter template, commands, agents, MCP, Skills, plugins and advanced tips to master Claude Code from ZERO.


I know how overwhelming it is to keep up with AI news. New tools drop almost every week. Each one demands time and focused effort just to understand what it does. Yet, most of them aren’t worth your limited attention.
You’ve got maybe 16 waking hours in a day.
Spending half of those testing every shiny new AI tool is a losing game.
After playing around with 100+ AI tools, one thing I realized: you don’t need more AI tools. Instead, what you need is a better tool that can cover a lot of things in your workflow.
So, if I had to point to one AI tool that’s given me the highest ROI on both productive hours AND understanding what AI can actually do—it’s Claude Code.
I’ve been using it for six months now. I spoked about it on my previous post. It keeps getting better and better every day.
It took me awhile to realize that I barely use Claude’s web version anymore.
Like most people, I used to spend 100% of my Claude usage was on Claude.ai.
Today? I’m fully Claude Code–pilled 80–90% of the time. The web version is now my backup, only when I need something quick and don’t want to open my project workspace.
That shift didn’t happen in an instant or because I’m technical—trust me, I’m not. It happened because Claude Code is such a powerful agentic tool that it can do something the web version fundamentally can’t:
It’s agentic. FAST. And it doesn’t forget.
All of my newsletter work lives inside Claude Code. It knows my audience. It knows which posts performed well and why. It knows my other projects, my priorities, my voice, how I write. It remembers what worked last week when I’m planning this week.
Here’s how my current folder looks like:

And here’s what it actually does for me:
Writes and edits my newsletter drafts
Analyzes performance data from 30+ published posts
Researches topics using integrated tools like Perplexity
Generates social content from newsletter posts (LinkedIn, Twitter threads, Substack Notes)
Manages my projects on Notion with instant context switching
Processes files (PDFs, spreadsheets, presentations) without needing separate tools
Runs autonomous agents that synthesize my week every Friday
Handles coding tasks when I need custom tools or automations
One workspace. Multiple capabilities. Persistent memory.
Most AI tools are one-night stands.
You get something useful, then never touch them again because you’re just curious and it doesn’t suit how you work—or it’s just tackling a small part of your workflow.
Claude Code is different.
It’s like working with someone who’s been on my team the whole time—someone who can write, research, analyze, code, and remember every project we’ve worked on together.
But I know some of you might have some concerns:
“But I’m Not Technical...”
I hear you. Using the terminal can feel intimidating if you’re not a technical person.
But I wasn’t technical either when I started.
Believe me, Claude Code is easier to learn than you think. The more you use it, the easier it gets. And the benefits far outweigh the initial learning curve.
Plus, this guide gives you two ways to use Claude Code:
VSCode or Cursor extension - Visual interface, easier to digest for beginners (recommended starting point)
Terminal/CLI - More powerful once you’re comfortable, but not required to start
“But, what about Claude Cowork, Wyndo? I heard it’s branded as Claude Code for the rest of us.”
I know Claude Cowork just launched a few weeks ago. It’s more user-friendly since it can be accessed on Claude desktop app.
But, Cowork’s capabilities are still limited. It’s great for getting started, but it can’t do what Claude Code can do:
No deep MCP integrations
No file system access at the same level
No persistent project context in the same way
And it still feels clunky and slow. If you want the full power, you need Claude Code. Period.
And this guide will make it as painless as possible. We’ll start with the VSCode/Cursor extension so you can ease into it without touching the terminal until you’re ready.
What You’re Actually Getting

Most Claude Code guides give you theory. This one gives you the working system.
I spent six months building my Claude Code workflow from scratch. Made every mistake. Hit every dead end. Rebuilt it three times before it stuck.
You’re getting the final version—the one that actually works.
The Starter Template
A cloneable repository with everything pre-configured. Clone it, run one command, and you have a working AI operating system. No guessing what to build first. No figuring out file structure. No wondering if you’re doing it right.
The Three Core Components
CLAUDE.md that teaches Claude how you work (so you stop re-explaining context)
Three daily-use commands I can’t live without (daily planning, research synthesis, project switching)
One autonomous agent that runs in the background while you work
The Customization Playbook
How to adapt this template for your workflow. When to add features. When to keep it simple. How to write your own commands. How to build agents that do the work for you while you’re busy with something else. How to install your Skills through plugins and marketplaces.
The Complete Reference
Every shortcut you need to master Claude Code, think and plan mode, Skills & Plugins, and MCP integration in one place. Bookmark it because you’ll use it constantly.
You can clone this and have a working system in 5 minutes. Then customize it as you discover what your workflow actually needs.
That’s what this template does. It starts simple, covers your actual needs, and grows with you.
What Claude Code Can Do
Before we dive in, here’s what Claude Code handles that you might not know.
Built-in Capabilities:
Reads PDFs, Docs, CSVs/XLSX, and PowerPoint files natively
Manages (create, delete, update, move, copy, etc) computer files
Executes code in multiple programming languages
Integrates with multiple tools via MCP: Perplexity, Firecrawl, Notion, Obsidian, Apple Notes, etc
Remembers conversations across sessions (memory system)
Runs autonomous agents in the background
Creates to-do list before taking actions
Supports custom commands for your specific workflows
Integrates Skills through plugins and run them for automated workflows
Uses plan mode for more reliable and accurate outputs
Ready? Let’s dive in.
🚨 A quick note about something I built.

I just launched Newsletter Compass with Joel Salinas because we got tired of juggling five different AI tools to write one newsletter. It’s the complete AI system for Substack creators - post titles generator & analyzer, content ideas, Notes, and welcome sequences all in one place. In your voice, not ChatGPT’s.
7-day free trial + 50% off for life with code WELCOME.
Getting Started with Claude Code
Let’s get you set up. But if this is the first time you’re hearing about Claude Code, you might want to read my previous post first.
I’m going to walk you through two installation options: VSCode/Cursor extension (easier, visual interface) and the terminal/CLI (more powerful, but optional for now).
If you’re not technical, start with VSCode or Cursor—we’ll use the extension for this walkthrough. You can always move to the terminal later when you’re comfortable.
Option 1: VSCode/Cursor Extension (Recommended for Beginners)
What you’ll need:
VSCode or Cursor installed on your computer. I suggest to use Cursor since it offers more AI-native experience than VSCode. Here’s where you can download VSCode and Cursor.
An Anthropic Pro/Max account connected on your web browser.
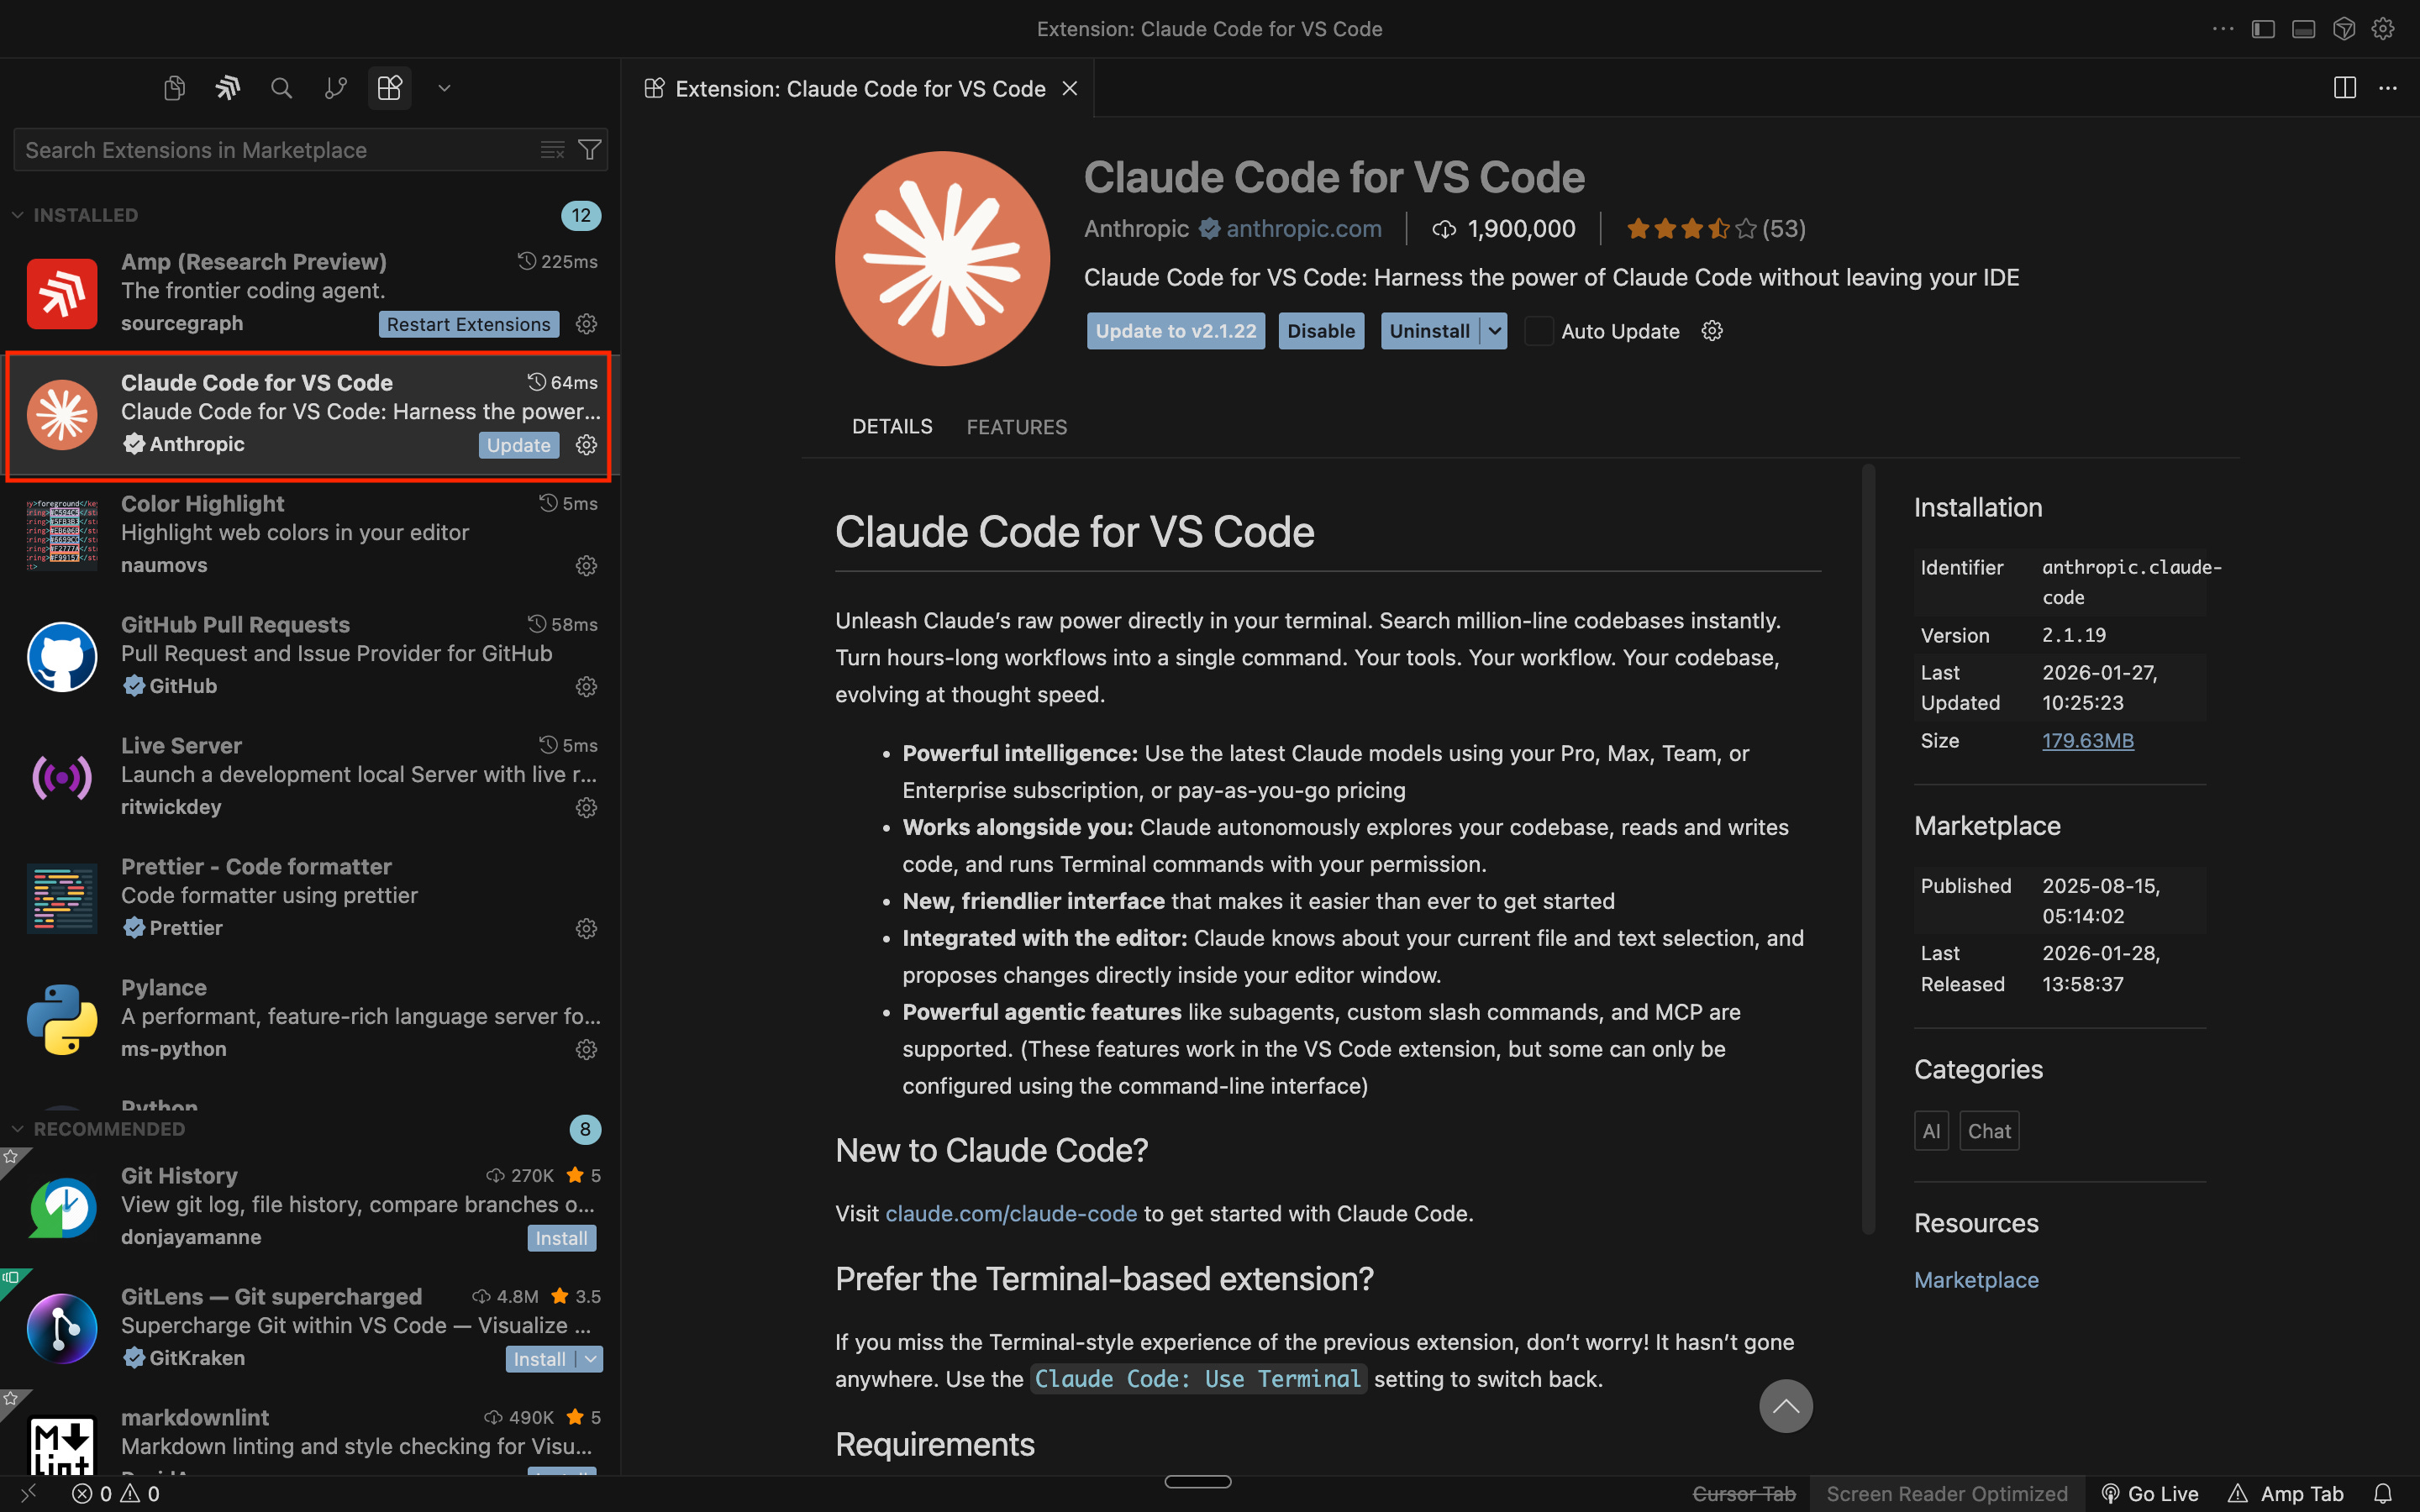
Step 1: Install the Claude Code Extension
Firs thing, Open Cursor/VSCode.
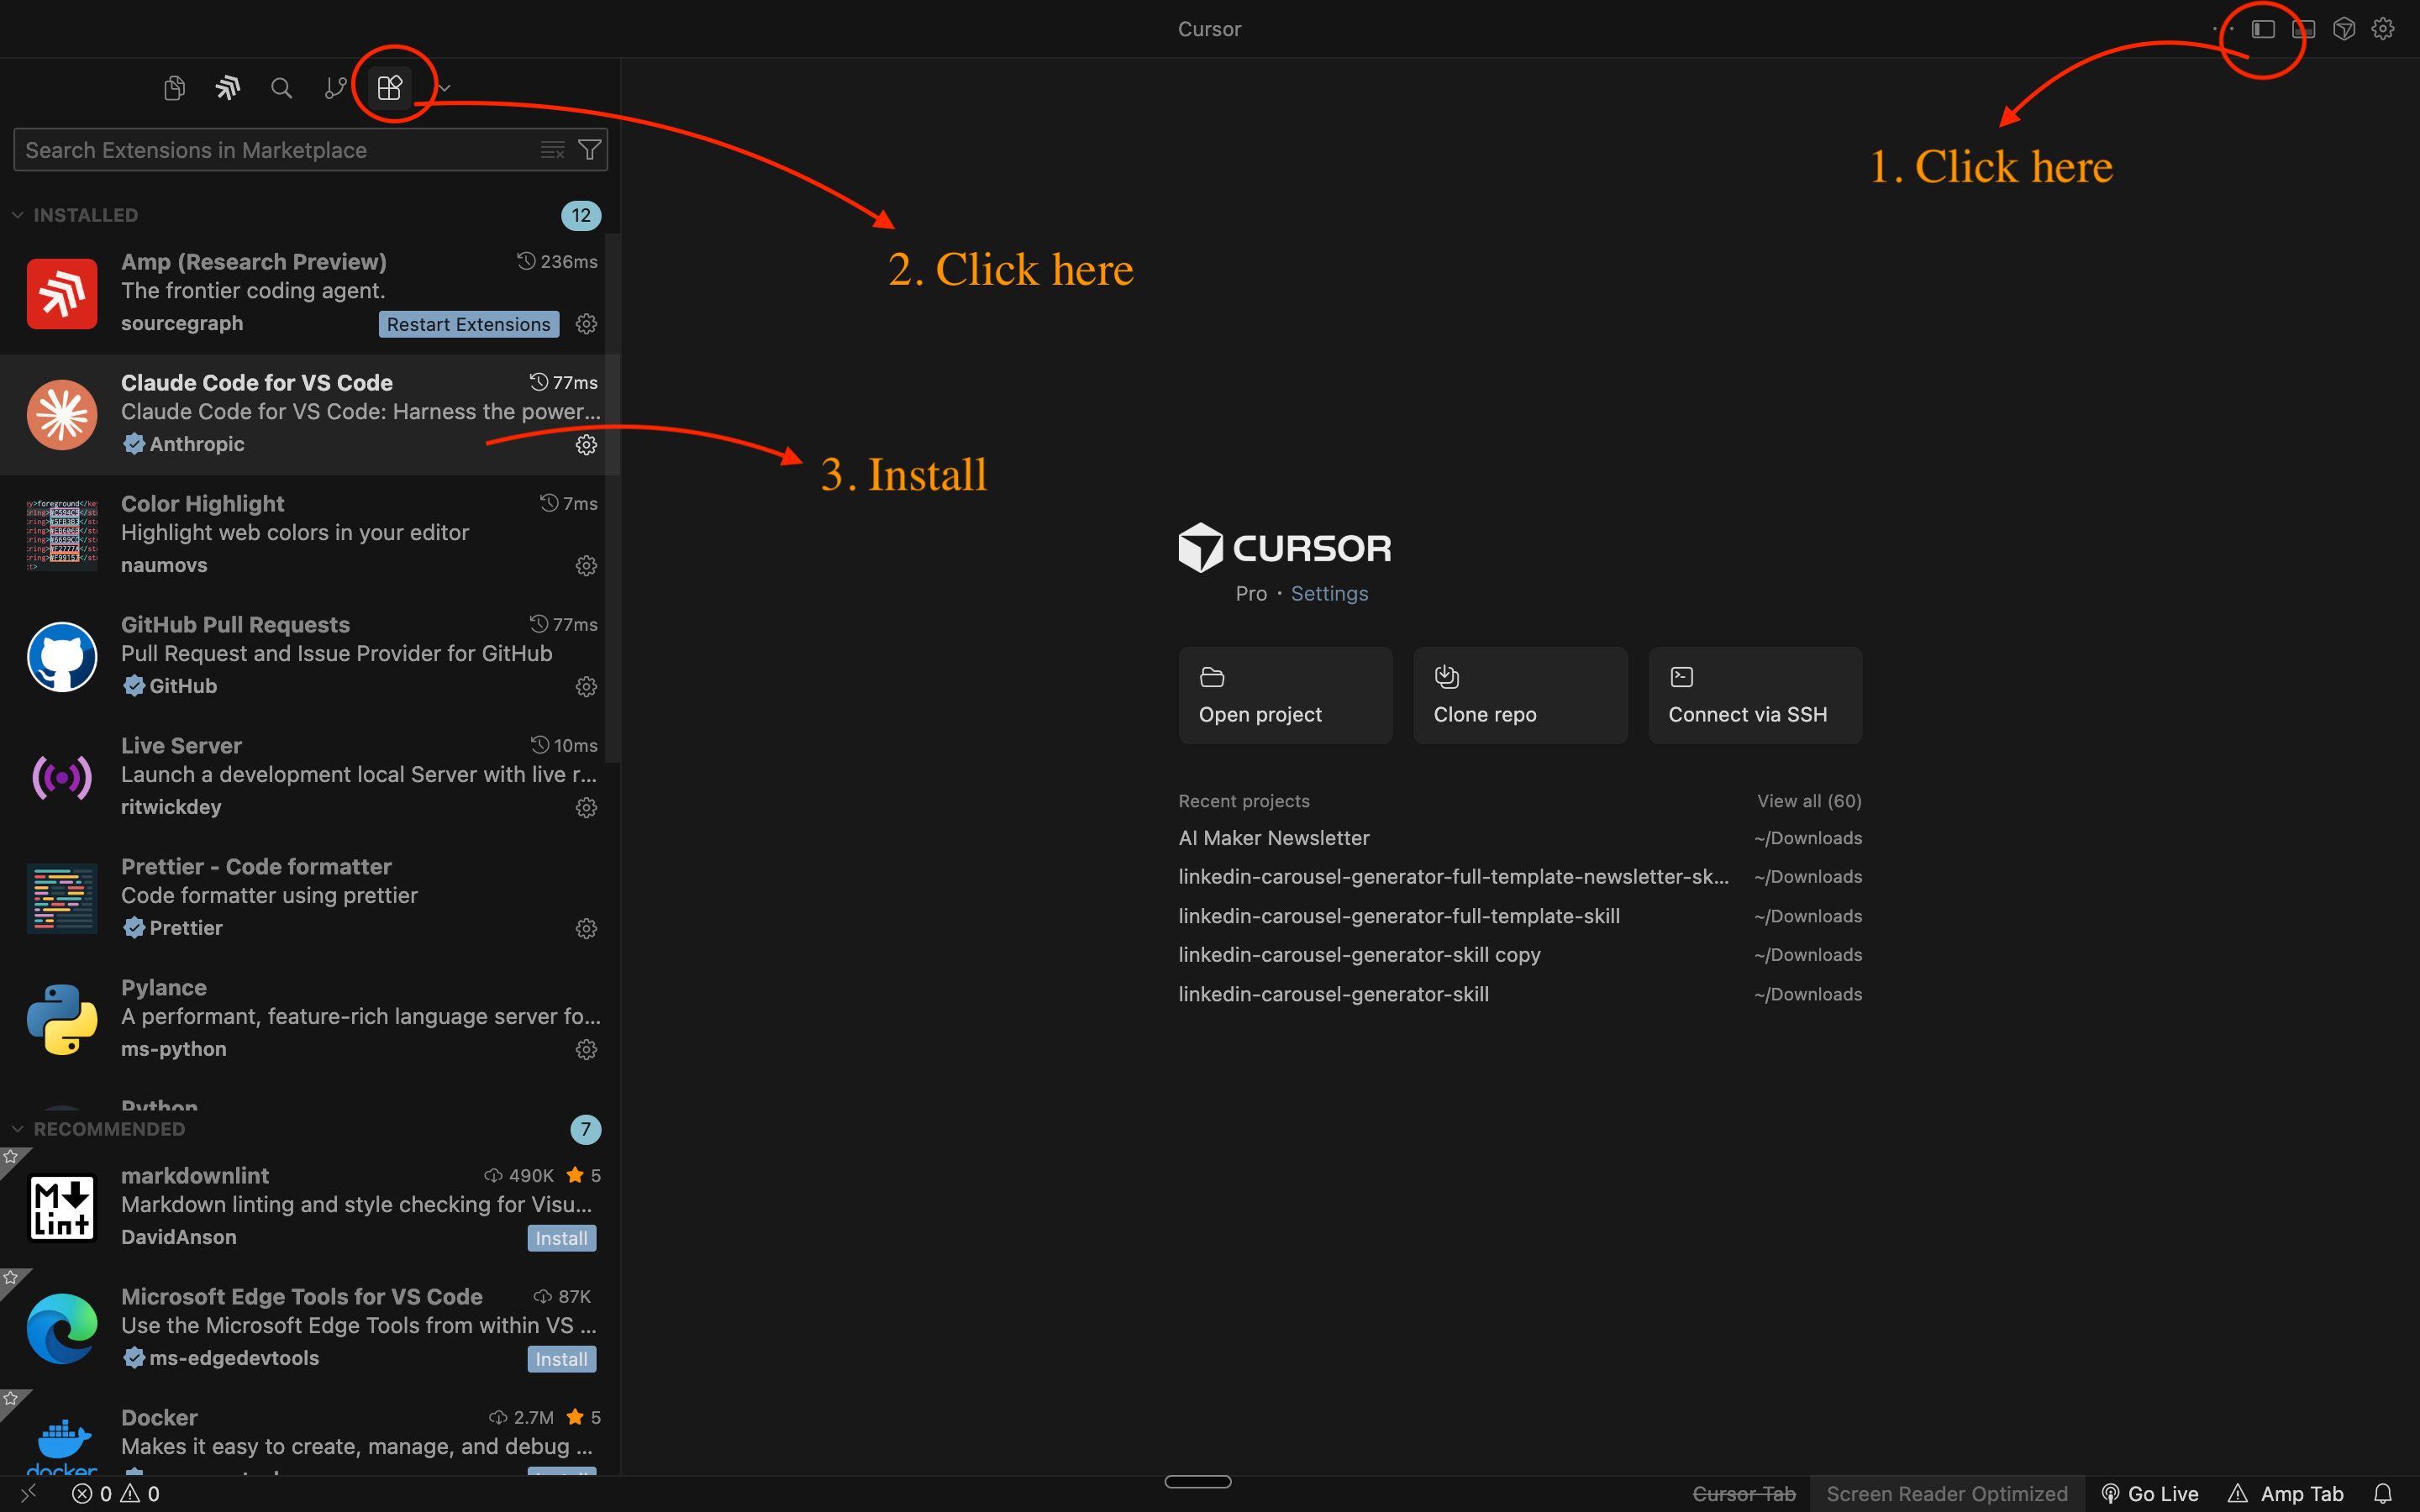
Then, toggle on the left Primary Side bar (or press `Cmd+Shift+X` on Mac, `Ctrl+Shift+X` on Windows).
Click the “Extension” menu. Search for “Claude Code for VS Code” and Click Install.
Step 2: Connect your Anthropic account
After installation, you’ll see a prompt to configure Claude Code.

Choose “Claude.ai Subscription” as the login method unless you use an API.
Connect it and you are ready to use it.
Step 3: Verify It’s Working
Open the Claude Code chat interface:

Go to Settings on top right of the Cursor screen
Click the “three dots”
And Click “Claude Code: Open”
Type a simple test message: “Are you Claude?”

If Claude responds with a “yes,” then you’re good to go.
Option 2: Terminal/CLI (For Later)
The terminal version is more powerful and gives you access to the full feature set. But you don’t need it to start. The Cursor or VS Code extension is enough to run Claude Code.
Yet nothing’s wrong if you want to install it on Terminal by typing this code:
npm install -g @anthropics/claude-codeThen activate Claude Code in your Terminal by typing:
claudeThen you need to login by typing this shortcut in your Claude Code chat:
/loginThen simply follow the instructions to connect your Anthropic subscription to Claude Code.
And it’s done!
In case you run into any issues, YouTube has plenty of resources on how to install it, this is one of them.
Open or Clone the Starter Repository
Now that Claude Code is installed, let’s get the starter template. To make things simple, in this scenario, we are going to use the Cursor extension instead of the terminal.
Open Cursor and select “Clone repo” to start cloning the folder we want to work on from Github. Additionally, you can also download the ZIP file here and open it with “Open project” menu on Cursor.
🚨 To get the template, skip to the Template section at the bottom of this post.
Then, we need to open Claude Code chat interface. Once done, now Claude Code has access to your project folder.
Here’s how it looks when you successfully open Claude Code:

The left side is where you can access your folders and files, the middle section is where you can chat with Claude Code and access your past conversations, and the top section shows your recent activity. Additionally, you can close the Cursor chat interface because we won’t be using Cursor; we use Claude Code instead.
To test if Claude can read your project folder, type a simple test message:
“Can you read this directory and tell me what files you see?”
Claude will read all files and send you a summary.

Since Claude can now read files, whenever you are working on something, simply refer to your files by using “@” to trigger file reference and use them as additional context for your work.
Understanding What You Just Cloned
Let’s take a quick tour of what’s in the repository. Don’t worry about memorizing this—just get familiar with the structure.
Main files you’ll interact with:
CLAUDE.md - This is the instruction manual for how Claude should work with you. It contains:
Your project context
Your preferences for how Claude communicates
Your work patterns and decision-making style
Anti-patterns (what NOT to do automatically)
.claude/commands/ - This folder contains three ready-to-use commands:
daily-planning.md - Analyzes your calendar and generates focused daily priorities
research-deep-dive.md - Comprehensive research synthesis
project-status.md - Instant context switching between projects
.claude/agents/ - Contains one autonomous agent:
weekly-synthesis - Runs every Friday (or on demand) to generate weekly accomplishments and blockers
templates/ - Template files you can copy and customize:
daily-plan-template.md` - Format for daily planning output
project-template.md` - Structure for project files
command-template.md` - Starting point for creating your own commands
examples/ - Real outputs from actual usage:
sample-daily-plan.md - What daily planning generates
sample-research-output.md - What research synthesis looks like
sample-project-status.md - Example project overview
sample-weekly-synthesis.md - Weekly agent output
claude-code-cheat-sheet.md - Complete reference for all shortcuts, think modes, file capabilities, and MCP integrations
Look, you don’t need to read all of these files now. I’ll walk through the important ones later.
Your First Command: Daily Planning
Let’s run something immediately so you see this working get benefits out of it.
Simply type this in the chat:
/daily-planningClaude will:

Ask you a few clarifying questions (How many priorities do you want? What’s most important today?)
Read your calendar if you’ve given it access
Generate a focused daily plan with 3 priorities
Save it to a file (if configured to do so)
Your first output might look like this:
# Daily Plan - January 26, 2026

ary 26, 2026

## Top 3 Priorities

1. **Finish Part 2 of Claude Code guide** (2 hours)

- Status: In progress, 60% complete

- Next: Write installation section

2. **Review newsletter analytics** (1 hour)

- Check open rates for last 3 posts

- Identify patterns for upcoming content

3. **Research MCP integrations** (1.5 hours)

- Test Perplexity setup

- Document installation process

## Calendar Overview

- 10am: Team standup (30min)

- 2pm: Deep work block (2hrs)

- 4pm: Weekly rev
What Just Happened?
You ran your first Claude Code command. Here’s what made it work:
The command file (.claude/commands/daily-planning.md) contains instructions for Claude
Your CLAUDE.md file provides context about how you work
Claude reads both, asks clarifying questions, and generates output based on your preferences
This is the pattern for all commands: instruction + context + execution.
And this is why Claude Code is so much more powerful than typical AI tools: it reads context before making decisions, follows instructions and other references, and then executes. It’s not guessing anymore; it’s creating deliberate, calculated reasoning.
What’s Next
You have:
✅ Claude Code installed (VSCode or Cursor)
✅ The starter repository cloned
✅ Your first command tested and working
✅ Basic understanding of the file structure
Now let’s understand what each component actually does.
The Starter Template Breakdown
Now that you’ve got Claude Code running and you’ve tested your first command, let’s break down what you actually cloned.
I’m going to walk through the three core components of the starter template:
CLAUDE.md - The instruction manual that teaches Claude how you work
Commands - On-demand workflows you trigger when needed
Agents - Automated workflows that run in the background
For each component, you’ll see what it does, how it works, and how to customize it for your workflow.
Don’t just copy-paste this. Understand why each piece exists. Then make it yours.
CLAUDE.md Foundation
1. What CLAUDE.md Actually Does
Think of CLAUDE.md as Claude’s instruction manual for working with you.
Most AI tools start from zero every time you open them. You explain your context, your preferences, your project. Then you close it, come back tomorrow, and... you’re explaining it all over again.
CLAUDE.md solves this.
It’s a persistent memory file that sits in your project directory. Every time Claude Code starts working, it reads this file first. It learns:
What you’re working on (project context)
How you want Claude to communicate (voice and tone)
Your work patterns and decision-making style (key preferences)
What NOT to do automatically (anti-patterns)
This is transformative. Instead of generic AI assistance, you get collaboration that matches your thinking style.
2. Two Ways to Create Your CLAUDE.md
Option 1: Use the `/init` shortcut (fastest)
If you want Claude to build your CLAUDE.md automatically, just run:
/initClaude will:
Read your project folder structure
Analyze the types of files you’re working with
Generate a custom CLAUDE.md tailored to your project
This is the fastest way to get started. Claude figures out what you’re doing and builds instructions accordingly.
But since it reads your project folder first, you need to ensure you’ve put all of your files, documentation, and any references you can think of inside that folder. Without this, using /init won’t make any difference.
For my newsletter operating system, I’ve put all of my post archives, audience research, post performance reports, LinkedIn and Substack notes, about page, why-upgrade page, etc., so when I run it, it can refer to these files to create a highly reliable and accurate CLAUDE.md file.
Option 2: Use the template (more control)
If you want to write your own CLAUDE.md from scratch (or customize what `/init` generated), use the template below.
I’m showing you the full structure with inline commentary so you understand what each section accomplishes.
Your CLAUDE.md Template: